Overview
This article provides a comprehensive guide for Salesforce administrators on how to install and configure the Influitive AppExchange Package (Version 3.529) in Salesforce Classic. It includes detailed instructions on connecting Salesforce with AdvocateHub, customizing page layouts for various objects, and integrating Influitive components to enhance the CRM's functionality with advocacy activities.
Information
If you are using Salesforce Classic version and have never installed any Influitive-Salesforce AppExchange package, this is the instruction article for you to follow.
- About AdvocateHub Package for Salesforce
- Installing the Influitive AppExchange Package 3.529
- Adding Components in the Page Layouts
- Salesforce-Influitive Individual Feature Setup
About AdvocateHub Salesforce Package
This AppExchange Package is the newest and latest version (Version 3.529) and it includes the following items:
- Compatibility with Salesforce Lightning and Salesforce Classic
- Improved Nomination button tool and MultiHub support
- Improved Reference Request tool and MultiHub support
- New Acts of Advocacy Object and MultiHub support
- New Salesforce Dashboard Reports
- Consistent labels and naming for the components
- Customizable Nomination button and new Hub flow for contact nomination
Installing the Influitive AppExchange Package 3.529
AppExchange Package Link
- Login to your salesforce.com account as a Salesforce administrator.
- Open a new tab and click on the following link to install the following package:
- Select Install for All Users , mark the checkbox and click Install .

- Once Installation is completed, you will see the completion message or email. Login to your Salesforce to check if the package version (Setup > Platform Tools > Installed Packages > Package Name: AdvocateHub > Version Number 3.529).
Notes:
- If you wish to install the AppExchange package to a Sandbox instance, make sure that you are signed into the Sandbox instance before clicking on the link to install (as per Point 2 above). Otherwise, it will install to your Production instance.
- We are currently applying to be a member of the Salesforce AppExchange Partner program. Therefore, please mark the acknowledgment checkbox to install the new package in the meantime. We thank you for your understanding.
Connect Salesforce Environment and the Hub
After the AppExchange package is installed, a Salesforce user would need to input their Salesforce username, password, and security token into your AdvocateHub to connect the instances together.
- Log in to the AdvocateHub instance as an administrator, in admin view, click on the Gear icon in the top right corner of the screen and click on Integrations to go to the integration library.

- Browse through the integration library until you find the Salesforce integration and click Manage.

- To enter your credentials, navigate to the Setup Tab and click Authenticate to start and you will see the following page. Choose the Auth Method: Standard vs OAuth 2.

- Choose the Target Environment for the Salesforce instance you're connecting, either Production or Sandbox instance. It is currently not possible to connect to both instances at the same time. However, you may switch the instance and re-authenticate at any time.
- Next, enter the Username , Password, Token and Organization ID associated with your Salesforce account. Please make sure the Organization ID is correct and that the connected integration user has the following Salesforce: Required Field Permissions :
- How to find your Token : Go to My Settings on Salesforce under your Admin name > Under the Personal option > Reset My Security Token > Click on the Reset Security Token button. You will be sent an email to your inbox containing the token.


- How to find your Organization ID : To find Organization ID, go to Salesforce Setup > In the Quick Find Search, type Company Information.

-
How to connect without a token :
- Login to Salesforce and go to Setup > Security > Network Access.
- Add Influitive’s IP address (contact support@influitive.com to acquire the IP address) to the list of trusted IP addresses. It can be both the start and the end of the range.
- Return to the Salesforce integration in the AdvocateHub and enter your credentials (without the token).
- You may get an error message the first time you save your credentials in the hub as our system is still communicating with SFDC to figure out the connection. If so, please try again and give it a few minutes to authenticate.
- How to find your Token : Go to My Settings on Salesforce under your Admin name > Under the Personal option > Reset My Security Token > Click on the Reset Security Token button. You will be sent an email to your inbox containing the token.
- Under App Exchange Version , please select version 3.5 . Once all the data is confirmed, please hit Save to authenticate the integration.
- If you run into any issues or received any error messages, please consult our Salesforce Errors and Troubleshooting documentation. If you can't find the answer to the issue, please take a screenshot of any error messages you've received and send an email to support@influitive.com.
Influitive Hub Mappings
Next is to set the Hub Mappings in your Salesforce to identify the Hub to connect with.
Hub Mappings Menu
- Once logged into Salesforce, click on your Profile Name > My Settings > Display & Layout > Customize My Tabs
-
Add Hub Mappings > Save

Add AdvocateHub to Hub Mappings Menu
- Once the menu is added, open the Influitive Hub Mapping from the Navigation tab
- Click on the New button to add the AdvocateHubs information:

- Enter your Influitive Hub's Program Name.

- For Hub ID, this information is available in your AdvocateHub. Sign in to your admin account in the Hub > Click on the gear icon > Integration > Influtive API > Manage > Click the Setup tab > Copy the X_ORG_ID.


- Paste in on the Hub ID field and Save.
- To recap:
Influitive Hub Mapping Name : Please enter the Name of your Hub Program
Influitive Hub ID : The X ORG ID Number provided in Influitive API
Influitive Hub Domain : Please enter the URL of the Advocatehub (e.g. https://hub.influitive.com ) - Click Save once you're done.
- For Multiple Hubs, you will need to add all the Hub Mappings for each Hub. More on MultiHub CRM Setup .
Adding Components in the Page Layouts
After installing and deploying the AppExchange package, the Salesforce administrator will need to modify a few object's layouts to add the Influitive integration components.
For further information on modifying Salesforce Page Layouts, please visit this Salesforce Help Page .
Page Layout Changes Checklist:
- Contacts Layout: Add Contacts Converted Details (Visualforce Page), Add Date Joined and Date Added to AdvocateHub fields, Add Influitive Acts of Advocacy Component (Related List), Add Reference Received via Influitive component (Related List).
- Accounts Layout: Influitive Acts of Advocacy Component (Related List), References received via Influitive Component
- Leads Layout: Adding the following fields: Referral ID, Influitve Referral Source, Referrer Company, Contact, Email, Name.
- Opportunity Layout: Adding Referral ID field and the Reference Request tool.
Contacts Page Layout
To start, click Setup > Customize > Contacts > Page Layouts > Click Edit next to the layout that your Salesforce users use. The following components are provided from the AppExchange Package:
Contacts Converted Details / Nominate Button
This widget will outline the Contact details in the Hub (e.g. email, Current Points, Lifetime Points, Nominated By).
- In the same page > Select VisualForce Pages > Drag ContactDetailConverted to the area that you prefer.
- Click Save to save the changes to the Layout.
Please note that if you have 1.12 or 1.15 version previously installed, you will need to remove the old Nominate button component. The Converted Contact Details will replace this component.
Date Joined AdvocateHub and Date Added To AdvocateHub
These fields will auto-update whenever the contact is added or joined the AdvocateHub.
Please note that if you have multiple Hubs and looking to integrate with Salesforce, you may skip adding these two fields. The replacement component will be noted in the Salesforce: MultiHub CRM Setup article.
-
In the same page > Select Fields > Drag Date Joined AdvocateHub and Date Added To AdvocateHub field to the area that you prefer. Click Save to save the changes to the Layout.

Influitive Acts of Advocacy Object
This custom object will list all the acts of advocacy activities that the contact completed in the Hub.
- In the same page > Select Related Lists > Drag and drop Influitive Acts of Advocacy to the area that you prefer. Use the Quick find search bar if you couldn't find the component.

- Once added, click on the wrench icon on the Influitive Acts of Advocacy component.

- In this window, please add the following fields to display in the Acts of Advocacy Object. Click OK once you're done.
- Acts of Advocacy Name (Required) - This describes the act of advocacy completed by the advocates.
- Advocacy Type - https:https://influitive-supportdesk.zendesk.com/hc/en-us/articles/15750759014674-Acts-of-Advocacy
- Source Title - This would be the challenge's name where the act of advocacy came from.
- Date Occurred - This is the date and time the act of advocacy occurred in the Hub.
- Prospect - If you are using the Reference request tool, this column will show the prospect's name that the contact completed a reference for from the Hub. If you are not using the Reference Request tool, you may skip adding this field column.
- Content - The Challenge or Discussions responses content.
Please Sort By: Date Occurred (Descending)

- Click Save to save the changes to the Layout.
Please note that if you have 1.12 or 1.15 version previously installed, you will need to remove the old Advocacy Activities component. The Acts of Advocacy component will replace this component.
References Received via Influitive Object
This custom object will list all the reference request challenges that the contact has completed. This is related to the Salesforce: Reference Request feature that is an additional fee. If you don't have this tool in your contract, please skip this step.
- In the same page > Select Related Lists > Drag and drop References Received via Influitive to the area that you prefer.

- Once added, click on the wrench icon on the References Received via Influitive component.

- In this window, please add the following fields to display in the Acts of Advocacy Object. Click OK once you're done.
- Acts of Advocacy Name (Required) - This describes the act of advocacy completed by the advocates.
- Advocacy Type - https:https://influitive-supportdesk.zendesk.com/hc/en-us/articles/15750759014674-Acts-of-Advocacy
- Source Title - This would be the challenge's name where the act of advocacy came from.
- Date Occurred - This is the date and time the act of advocacy occurred in the Hub.
- Contact - This field will show which Salesforce contact (Hub member) that completed the reference request challenge for this Salesforce prospect contact.
- Content - The Challenge or Discussions responses content.
- Program Name - This will show the name of the Hub where the activity happens.
Please Sort By: Date Occurred (Descending)
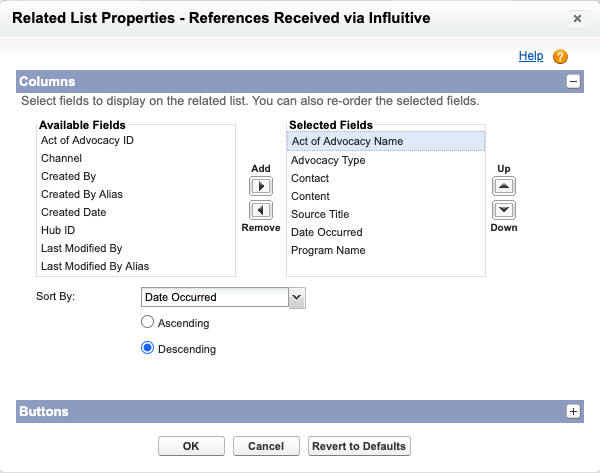
- Click OK and Click Save to save the changes to the Layout.
Please note that if you have 1.12 or 1.15 version previously installed, you will need to remove the Advocacy Activities (prospect) component. The Reference Given will replace the Advocacy Activities (Prospect) component.
Accounts Page Layout
To start, click Setup > Customize > Accounts > Page Layouts > Click Edit next to the layout that your Salesforce users use. The following components are provided from the AppExchange Package:
Influitive Acts of Advocacy Object
This custom object will list all the acts of advocacy activities that the contacts in the Account have completed in the Hub.
- In the same page > Select Related Lists > Drag and drop Influitive Acts of Advocacy to the area that you prefer.
- Once added, click on the wrench icon . In this window, please add the following fields to display in the Inlfuitive Acts of Advocacy Object . Click OK once you're done.
- Acts of Advocacy Name (Required) . This describes the act of advocacy completed by the advocates.
- Advocacy Type - https:https://influitive-supportdesk.zendesk.com/hc/en-us/articles/15750759014674-Acts-of-Advocacy
- Contact - This is the contact record the completed the acts of advocacy.
- Source Title - This would be the challenge's name where the act of advocacy came from.
- Date Occurred - This is the date and time the act of advocacy occurred in the Hub.
- Prospect - If you are using the Reference request tool, this column will show the prospect's name that the contact completed a reference for from the Hub. If you are not using the Reference Request tool, you may skip adding this field column.
- Content - The Challenge or Discussions responses content.
Please Sort By: Date Occurred (Descending)
- Click OK and Click Save to save the changes to the Layout.
Leads Page Layout
To start, click Setup > Customize > Leads > Page Layouts > Click Edit next to the layout that your Salesforce users use. The following components are provided from the AppExchange Package:
- In the same page under Fields > Drag and drop the following fields to the preferred area of the layout
- Referral ID (appexchange) - Required
- Influitve Referral Source - Recommended
- Referrer Company, Contact, Email, Name - Optional
- Click Save to save the changes to the Layout.
Opportunity Page Layout
To start, click Setup > Customize > Opportunity > Page Layouts > Click Edit next to the layout that your Salesforce users use. The following components are provided from the AppExchange Package:
Referral ID (appexchange)
- You are required to add this field if your Referral Lead from Influitive Hub in Salesforce converts into an Opportunity.
- In the page, click on the Fields menu option > Drag and drop Referral ID (appexchange) field to the appropriate area of the layout.
- Click Save to save the changes to the Layout.
Reference Request Tool
Note: This tool is used to create reference requests challenges in the AdvocateHub. The Request a Reference component should only be added to the Opportunity object. It will not work on any other Salesforce object type. This Reference Request feature may be an additional cost, please contact your CSM to confirm.
- In the same page > Head over to the Visualforce Page option > Drag and drop RequestReferenceComponentConverted to the preferred area on the layout.
-
Once added, you will need to adjust the size of the Visualforce Page. To do this, click on the wrench icon and change the Height (in pixels) to 600 and Show scrollbars = Checked and click OK.


-
Click Save to save the changes to the Layout.
-
Reference request tool is all done! To see the Hub members and Reference requestor experience on using the Reference Request Feature as well as the best practice for this feature, please follow the following article - Salesforce: Reference Request
If you like to add the Reference Request tool as a button in Salesforce, please see this article: How to add Reference Request Converted as a button in Salesforce .
Salesforce-Influitive Individual Feature Setup
Great! The Salesforce instance is now ready to be populated with content from Influitive Hub. Please continue the setup on the Influitive Integration by going through the following articles for the Salesforce integration features that you're looking to enable in the Hub.
FAQ
What is the Influitive AppExchange Package and what does version 3.529 include?
The Influitive AppExchange Package is a set of components designed to integrate Influitive's AdvocateHub with Salesforce. Version 3.529 is the latest version that includes various elements to be added to Salesforce page layouts, enabling the display and management of advocacy activities within the CRM.
How do I connect my Salesforce environment to AdvocateHub?
After installing the AppExchange package, you need to input your Salesforce username, password, and security token into your AdvocateHub to establish the connection between the two instances.
What changes need to be made to Salesforce page layouts after installing the AppExchange package?
Post-installation, Salesforce administrators should modify the layouts of Contacts, Accounts, Leads, and Opportunities to include Influitive integration components like Acts of Advocacy, References Received, and other relevant fields provided by the package.
Are there any additional costs associated with the Reference Request feature in the Influitive AppExchange Package?
The Reference Request feature may incur additional costs. It is recommended to contact your Customer Success Manager (CSM) to confirm any extra charges.
Where can I find further information on customizing Salesforce layouts for Influitive integration?
For more detailed instructions on modifying Salesforce Page Layouts for Influitive integration, you can visit the Salesforce Help Page or refer to the specific articles provided for each Salesforce integration feature you wish to enable in the Hub.
Priyanka Bhotika
Comments