Overview
The article provides a step-by-step guide on how to add and customize the 'Nominate' button in Salesforce for both Classic and Lightning versions, enabling users to nominate potential advocates to an organization's Advocacy Program. It details the process of nominating contacts, viewing nominee profiles, and managing pending nominations through the Hub Administrator Dashboard.
Information
Your Salesforce is full of potential advocates. With the nominate button, you can make it easy for other members of your organization to suggest all-star customers for your Advocacy Program.
- Adding the Nominate Button to the Salesforce Layout
- Customize Nomination Box text and button
- In Hub Nomination Flow
Adding the Nominate button to the Salesforce Contact Layout
Salesforce Classic
Once logged into Salesforce Classic version, follow these steps:
1. At the top of the Salesforce homepage, click on your/ your team's name > Setup.

2. On the left side of the page, under the App Setup heading, click Customize > Contacts > Page Layouts .

3. Click the page layout that you would like to contain the nominate button. You should add the nominate button to each of the Salesforce user types that should have the ability to suggest advocates.

4. Find "ContactDetailConverted " under the Visual Force page section of the layout properties, and drag ContactDetailConverted to the desired section on the page layout. Please do not choose the Nominate Contact VF Page since this is a retired component

5. In the section that you just added ContactDetailsConverted to, click the wrench for additional properties.

6. You can adjust the size of the VisualForce Page but we recommend making the height of the visual force page 200 pixels to minimize the real estate of this section. Then check the "Show scrollbars" checkbox to allow scrolling, then click the OK button.

7. Save the contact Page Layout.

The nominate button has now been added to your Contacts page layout.
Note that in order for the Salesforce users to be able to view and access the Nominate button, their Salesforce profile needs to have Edit / Write access to the Contacts.
Salesforce Lightning
Lightning version will need to add the component via the Lightning Page Builder. Once logged into Salesforce Lightning version, follow these steps:
-
Go to Contacts > Select a contact record > Click on the Gear icon > Edit Page. The following components are provided from the AppExchange Package

-
Select ContactDetailComponent and drag and drop it on the page. (Anywhere you like)

-
Once you're happy with the location, click Save to save the layout.
Customize the Nominate button in Salesforce
Note: You must upgrade to at least version 3.5 of the Salesforce AppExchange Package
- In Salesforce, head over to the App Launcher or Navigation menu to find Influitive Configurations
- Once you're on the page, there are a few configuration options.

- Click on the Edit button next to Customize Nomination Box . Here you have the option to customize the text shown in the Nominate Contact box as well as the button. You can format the Nomination box text content and even hyperlink a URL. Click Save, once you're happy with the customization.

- Once you've saved the setting, here's what it would look like in the Contacts page > Nominate Contacts Box for contacts who do not exists in the Hub yet:

Notes:
- Supported merge field tags: #Contact.Name, #Contact.LastName, #Contact.FirstName and #Program.Name
- Maximum character limit is 255
- Maximum image size upload is up to 1MB
Nomination Flow from Salesforce to the Hub
The nominate button resides on the Contact layout in Salesfoce and looks like the image below. You can now encourage others in your organization to identify satisfied customers and nominate them to be Nominees in your hub. Nominees are Hub contacts that need to be invited to the Hub in order to join and gain access to the Hub.
All the Salesforce users have to do is click the "Nominate" button:

Once the button is clicked, a mini profile for the nominee / advocate will appear in the same space (as below).

At the same time, the nominated contact will appear in the Pending Nominations List for the Hub Administrator to review from the Administrator Dashboard.

Click on the Review button and you will see the recently Nominated contact.

In this page, you have the option to:
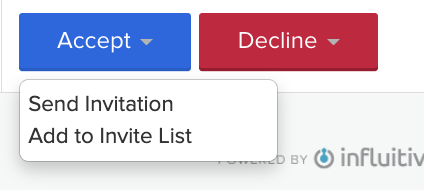

- Accept and Invite the contact immediately by sending an email Invite. You can customize the email invitation before you send. Once invited, they will be added to the Invite List as Nominee with Status: Invited.
- Accept and only Add the contact to the Invite List, perhaps you would like to invite them to the Hub at a later date. The contact will be added as a Nominee in the Invite List with Status: Not Invited like so:

- Decline the Contact only, will add the contact in the Invite List with Status = Declined.

- Decline and delete the contact from the Hub. You will not see this contact anywhere in the Hub once deleted. Once deleted, the Nominate button will re-appear on the Salesforce contact page for the Salesforce user to re-nominate in the future.
If you have not selected any action (Accept / Decline), the Salesforce contact will not be added to the Invite List just yet.
If the nominator (shown in the image above as Tim Carr) is not a member of your Hub at the time of nomination, they will also be added to the list, with "Salesforce" as the source.

FAQ
How do I add the Nominate button to my Salesforce Contact layout?
In Salesforce Classic, follow the provided steps after logging in to add the Nominate button to your Contacts page layout. In Salesforce Lightning, use the Lightning Page Builder to add the component.
What is required to use the customization feature for the Nominate button in Salesforce?
You must upgrade to at least version 3.5 of the Salesforce AppExchange Package to use the customization feature for the Nominate button.
What happens when a Salesforce user nominates a contact?
The nominated contact's mini profile will be displayed, and they will be added to the Pending Nominations List for the Hub Administrator to review and manage from the Administrator Dashboard.
What are the options available for a Hub Administrator when reviewing a nomination?
Upon reviewing a nomination, the Hub Administrator can either accept the nominee, adding them to the Invite List, or decline the nomination. If no action is taken, the Salesforce contact will not be added to the Invite List.
What happens if the nominator is not a member of the Hub at the time of nomination?
If the nominator is not a member of the Hub when they make a nomination, they will be added to the list with "Salesforce" as the source.
Priyanka Bhotika
Comments